Java Viewer User Manual
This document is the user manual for the SIMBA java viewer tool.The main topics of this manual are:
- Viewer modes: single panel, compact, double panel
- Viewer basics (this section)
- Performing measures
- Editing boundaries
- Settings reference
Basic Operations
The displaying of an image data set consiting of a number of image slices is managed by the navigation panel that is described in detail in the following sections.Navigation
You move through the images in the image data set by using the scroll bar in the upper right of the image viewer. The tool for navigating through an image data set is on the top right of the image viewer in single panel mode or bottom left in compact mode.

- Click the right arrow to move forwards through the scan.
- Click the left arrow to move backwards through the scan.
- Click inside the scroll to jump forwards or backwards 5 images.
The two buttons at each side of the Navigation label can be used to scroll automatically the sequence: the button on the left displays the previous slices, while the one on the right displays the following slices of the scan. The buttons may be pressed more than once; if the button direction coincides with the scrolling direction, the animation becomes faster otherwise the scrolling direction is reversed.
Magnification
The image can be magnified around a focal point (represented by an X on the image). When you load an image data set, the viewer will automatically place the focal point at the center of the first annotation, if any, otherwise at the center of the image.
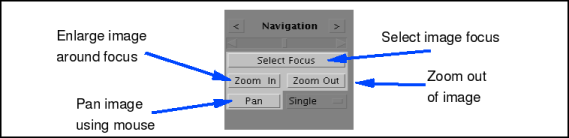
- Click the Zoom In button to magnify the image around the focus point.
- Press the mouse button and drag the mouse to pan the image.
- Click the Zoom Out button to demagnify the image.
To change the focal point in the image:
- Click the Select Focus button. The button will be surrounded by a red border, meaning that this will be the active tool in the image.
- Click inside the image to set the new focus.
- Click the Zoom In button to magnify around the new focal point.
The default setting is to use bicubic interpolation when magnifying the image. To explore the option of not using interpolation:
- Select No Interpolation from the Settings menu.
- Zoom in and zoom out to see the affect of selecting no interpolation.
- Select Bicubic Interpolation to turn on the smoothing interpolation.
You can also use the "a" key to toggle between the interpolation modes.
Before proceeding to the next section, zoom out of the image and place the focal point in the center of the region of interest (ROI).
Display Modes
There are three ways to display the image data sets. The different display modes are accessed through the menu to the right of the Pan button. Clicking on the drop-down menu will show several options.

- Select Montage to use the Montage view. This will show a Region of Interest (ROI) through 16 slices of the image data set. The ROI is centered around the focal point.
- Select Cinema to use the Cinema view. This allows you to rapidly move through through the ROI defined above.
- Drag the scrollbar to view each slice of the ROI. You can also use the arrow buttons to move through the slices.
- Select Single to go back to the default Single view.
Windowing
The window settings of the display can be set manually by entering the desired values into the Window and Level fields. The windowing panel is located below the navigation panel.
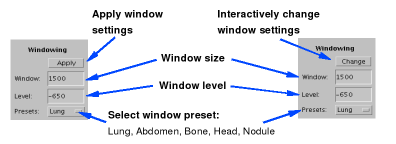
- Enter 1000 into the Window field.
- Enter -800 into the Level field.
- Click on Apply to set the new window settings.
- Select "Abd" to use the Abdomen window.
- Select "Bone" to use the Bone window.
- Select "Head" to use the Head window.
- Select "Nod" to threshold the image at -400 HU.
- Select "Lung" to use the standard Lung window.
- Select "Byte" to window a byte image.
- Select "Step" to threshold a byte image at 128.
- Select "X-ray" to view X-Ray images.
- Select "Auto" to display images rescaled uniformly between their minimum and maximum values.
You can also use the "h" and "l" keys to increase or decrease by 1 the windowing level, or by 10 if shift is pressed. Keys "j" and "k" increase and decrease by 1 the window size, or by 10 if shift is pressed.
Make sure to select the standard Lung window before proceeding to the next section.
Dynamic Windowing
You can use dynamic windowing by switching to 16-bit image mode. This is not recommended if you have a slow internet connection. If you have a slow internet connection, it is recommended that you use the 8-bit Image mode. There is no difference in image quality between the two different modes. The only difference is that the dynamic windowing option is available only when in the 16-bit Image mode.
- Click on the Settings button and select 16-bit Images or 16-bit Compressed Images. Select the latter if you have a slower connection.
- Click on the Change button in the windowing panel.
- Press and drag the mouse in the image to change the window. The window settings will be reflected in the Window and Level fields of the windowing panel.
- Select 8-bit Images to get back to the normal windowing method.
Image Viewer Shortcut Keys
The following is review of shortcut keys for the image viewer as described in this tutorial:
| Key | Action |
|---|---|
| f,up-arrow | Show next image |
| b,down-arrow | Show previous image |
| page-up | Jump forward by 5 images |
| page-down | Jump back by 5 images |
| u | Select Focus |
| i | Zoom In |
| o | Zoom Out |
| p | Zoom Pan |
| a | Switch between no interpolation and linear interpolation |
| w | Perform windowing and select the windowing tool |
| e | Select the boundary editing tool |
| r | Select the last-used measuring tool |
| h | Increase the windowing level by 1 (if shift is pressed, by 10) |
| l | Decrease the windowing level by 1 (if shift is pressed, by 10) |
| j | Increase the window size by 1 (if shift is pressed, by 10) |
| k | Decrease the window size by 1 (if shift is pressed, by 10) |
| m | Cycle through the measuring tools |
| n | Cycle between boundary editing modes |
| z | Show/Hide the reference boundary |
| x | Show/Hide the edit boundary |
| c | Show/Hide the computer boundary |
Make sure that the applet has the keyboard focus before you use the shortcuts. This can usually be achieved by placing the cursor within the applet.
Last updated 2011-09-07, AMB